Using Obsidian with Bridgetown
One of the things that I wanted when writing these posts was the ability to edit my blog post in an editor that supported Markdown out of the box. I am familiar with Obsidian and have used it in the past and thought about how easy it would be in order for me to combine both Obsidian and Bridgetown together so I set forth with this task at hand!
Obsidian integration
I’m not going to go into great detail about how Obsidian works or what it is, you can consult their website for that information. What I am going to tell you though is how to set up Bridgetown with Obsidian, so the first thing you can do is to designate the src folder as the vault for Obsidian.
This allows you to have images rendered if you have saved them under the images folder that is also under src which I have as the default setting.
The next step is to add src/.obsidian/* to your .gitignore, this allows you to at least keep your repository Obsidian free.
With just these steps you should now be able to go to your _posts folder and create posts! But one thing you’ll find that is missing (at least this is something that I found missing) is the ability to create posts with the included metadata. Now for this we turn to…
Templates
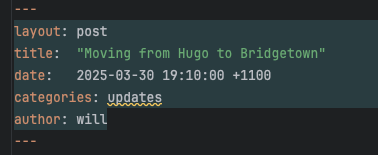
Obsidian supports template creation out of the box and that is something we can leverage in order for us to be able to create posts with the supplied metadata. You’ll notice that Bridgetown posts have the following metadata:
Likely you want something similar, so all you have to here is to setup your templates following this guide, then you can create a new templates that looks something like this:
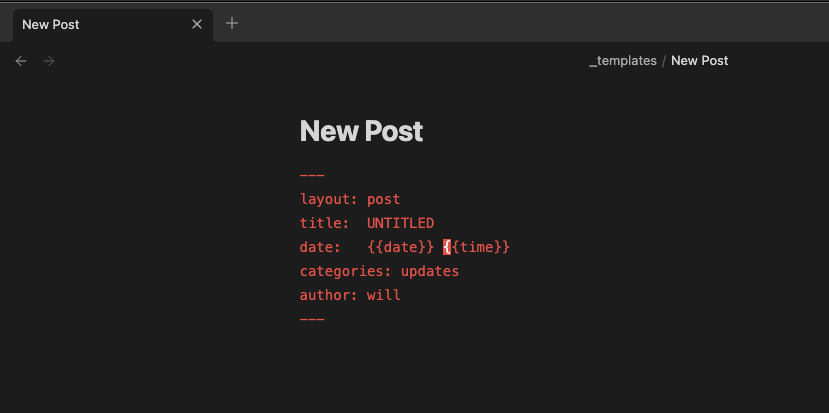
Now with this you can create a new note and apply the template, {{date}} and {{time}} will automatically be filled in for you thanks to Obsidian.
That’s about it really! Once you have all this setup, the process of creating new posts should be a lot simpler! And you have access to a markdown editor that you can use!